How to Delete Text in Photoshop for Seamless Edits
We've all been there—staring at an otherwise perfect photo, ruined by a misplaced caption, a distracting watermark, or a date stamp from an old camera. Getting that text out cleanly can feel like a daunting task, but with the right Photoshop tools, it's often surprisingly straightforward.
So, how do you get started? The best approach really depends on the picture itself. If you're lucky and the text is on its own layer, you can just delete the layer. Problem solved. But most of the time, the text is flattened into the image, and that's where things get interesting.
Your main choices will come down to a few key tools. For text sitting on a simple, uncluttered background—like a clear sky or a solid-colored wall—Content-Aware Fill is usually your fastest and best bet. But if the text covers a more complex area with lots of texture, like a patterned shirt or a field of grass, you'll need the precision of the Clone Stamp Tool to get a seamless result.
Which Tool Should You Use?
To make the decision easier, think about your image and what you're trying to achieve. The right tool will save you a ton of time and frustration. This quick guide will point you in the right direction.
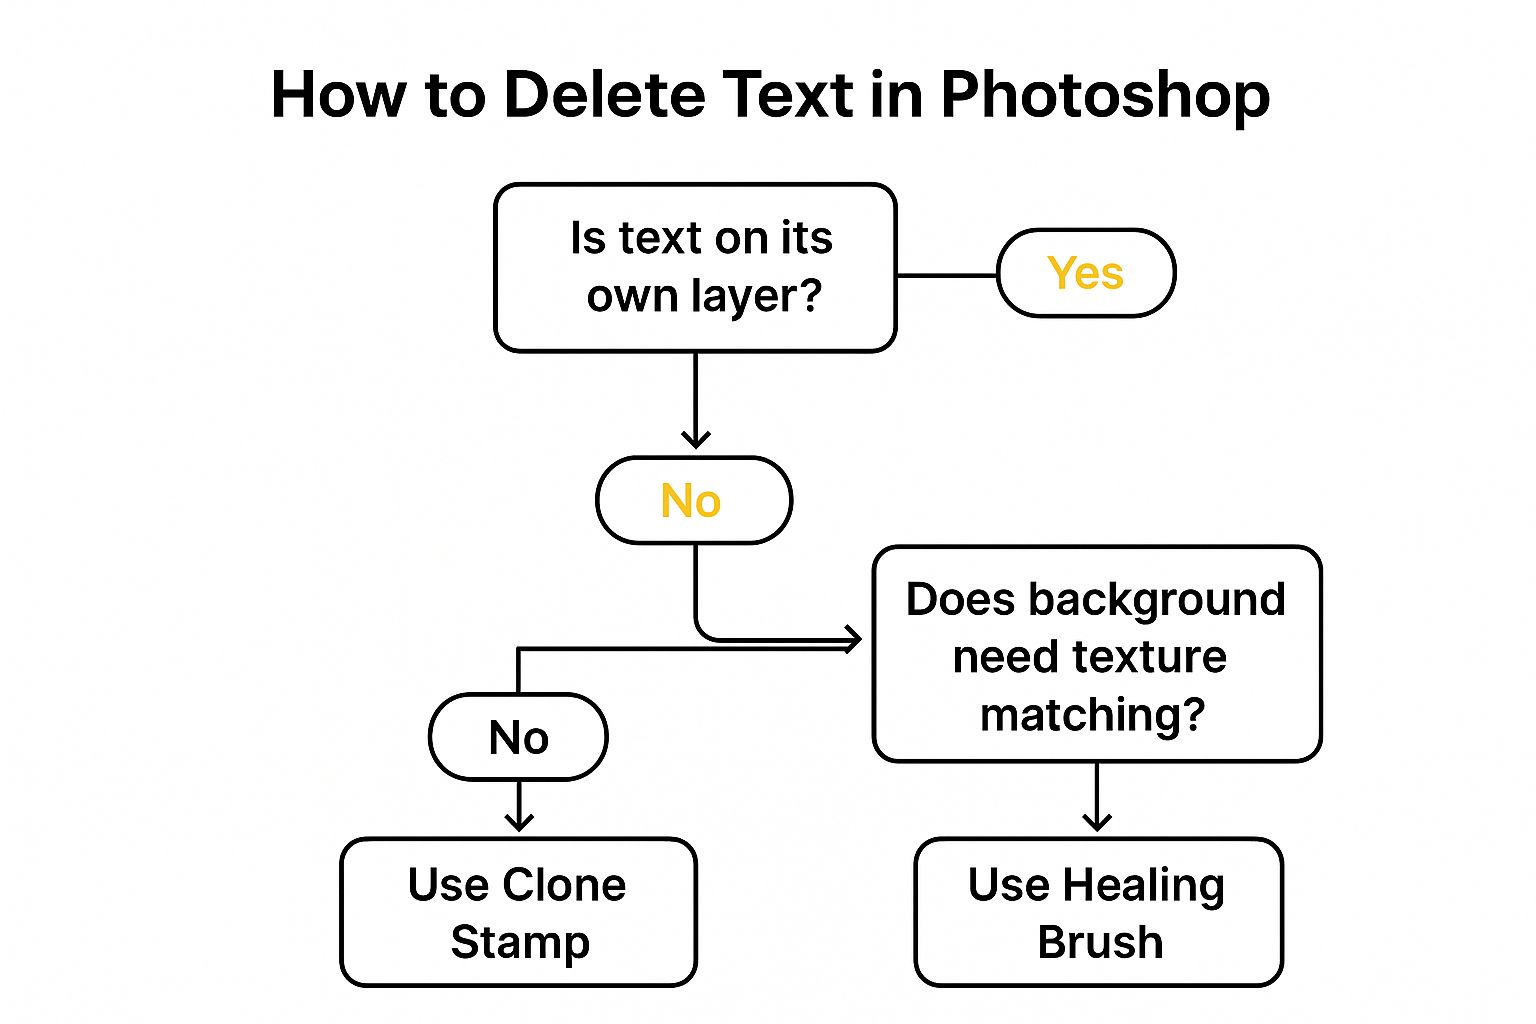
As you can see, the first question is always: "Is the text on its own layer?" If it is, you're in luck. If not, your decision between the Clone Stamp and the Healing Brush often comes down to how much texture you need to replicate in the background.
Choosing Your Photoshop Text Removal Method
To give you a clearer picture, here’s a quick comparison of the most common Photoshop tools for deleting text. This should help you pick the best one for your project right from the start.
| Method | Best For | Difficulty | Result Quality |
|---|---|---|---|
| Content-Aware Fill | Simple backgrounds, quick fixes | Easy | Good to Excellent |
| Clone Stamp Tool | Complex/textured backgrounds | Medium | Excellent (with practice) |
| Layer Masks | Non-destructive edits | Medium | Excellent |
| Healing Brush | Blending small imperfections | Easy | Good |
The takeaway here is pretty simple: don't overcomplicate things if you don't have to.
My Personal Tip: I always start with the path of least resistance. Try Content-Aware Fill first. It's incredibly powerful and often gets the job done in seconds. If it creates weird smudges or artifacts, then it's time to roll up your sleeves and grab the Clone Stamp Tool for more manual control.
By the way, if you’re replacing the text you removed, a little knowledge about the different types of typefaces can make a huge difference in your final design. And for those times you don't have access to Photoshop or just need a quick, browser-based fix, we've explored some great alternatives over on our blog. You can find more guides and tool comparisons at https://snapcaptionremover.com/blog.
Using Content-Aware Fill for a Quick Fix
When you need to get rid of text in Photoshop, your first port of call should almost always be the Content-Aware Fill feature. Honestly, it’s less of a tool and more like straight-up magic. It works by analyzing the pixels right next to your selection and then cleverly generating a fill that blends right into the background.
Think of it as a digital art restorer. It doesn't just smudge the area; it actually rebuilds what's underneath the text, making it look like it was never there in the first place. This is your go-to solution for images with relatively simple backgrounds—things like a clear blue sky, a grassy field, or a textured wall.
It All Starts With a Good Selection
Here’s the deal: the success of Content-Aware Fill depends almost entirely on how well you make your initial selection. A sloppy selection guarantees a messy result.
So, forget the basic rectangular marquee tool. Your best friend here is the Lasso Tool (just press "L" on your keyboard). You’ll want to carefully trace around the text you’re removing. The key is to leave a tiny, consistent margin around the letters. This precision tells Photoshop exactly what needs to go and stops it from pulling any unwanted pixels from the text itself into the final patch.
Expert Tip: A common mistake is selecting too much of the background. If you grab huge, irrelevant areas, you risk confusing Photoshop, which can lead to blurry or mismatched results. A tight, snug outline is always the better move.
Once you’ve got your selection just right, head up to Edit > Content-Aware Fill in the main menu. This will launch a new workspace where the real magic happens.
Fine-Tuning the Fill
Inside the Content-Aware Fill workspace, you get a ton of control. Your image appears on the left, covered with a green overlay. This green area is the sampling zone—it's where Photoshop is "looking" to find pixels to create the fill.
If you notice the green overlay creeping onto an area you don't want to be sampled (like a person's face or a different background element), you can simply paint over that part to remove it from the sampling zone. This is a lifesaver for more complex images.
Let's walk through a real-world example. Say you have a perfect photo from a trip, but there's an ugly "Aloha!" text overlay on the sandy beach.
- Select First: Grab the Lasso Tool and draw a tight selection around the "Aloha!" text.
- Open the Workspace: Navigate to
Edit > Content-Aware Fill. - Refine the Sample: Photoshop might be trying to sample from the ocean waves nearby. In the workspace, use the brush to "erase" the green overlay from the water, forcing it to only sample from the sand.
- Hit Apply: Click OK, and poof—the text is gone, replaced with perfectly matching sand.
Mastering this technique is fundamental to learning how to delete text in Photoshop effectively. And while pro tools like Photoshop give you incredible power, sometimes you just need a fast fix without firing up a big program. For those moments, browser-based tools can be a great alternative. We're proud of the technology and people behind our own tools; you can see a full breakdown on our credits page. At the end of the day, it's about picking the right tool for the task at hand.
When tools like Content-Aware Fill just don't cut it, leaving you with blurry spots or weird digital artifacts, it’s time to roll up your sleeves and take manual control. For those edits that demand absolute precision, the Clone Stamp Tool is the answer. It’s my go-to when I need to be in the driver's seat.
Think of it less like a magic wand and more like performing delicate surgery on your image. Instead of letting an algorithm guess what the background should look like, you're the one calling the shots. This is a lifesaver for images with complex backgrounds—think repeating textures like a brick wall, strong geometric patterns, or the sharp lines of a building—where automated fills often fall flat.
Getting the Hang of It
First things first, grab the Clone Stamp Tool from your toolbar, or just hit the "S" key as a shortcut. The whole trick to this tool is setting a source point.
To do this, hold down the Alt key (or the Option key if you're on a Mac) and click on a clean area of the image you want to copy from. You'll see your cursor change to a little crosshair, which means you're ready to sample those pixels.
Now, just release the key and start painting over the text you want to erase. As you paint, Photoshop will copy the pixels from your source point. For the best results, always use a soft-edged brush. This feathers the edges of your new pixels, helping them blend right into the existing background without any harsh lines.
My Biggest Tip: The number one mistake I see is creating a repetitive, rubber-stamped look. To keep things looking natural, you have to change your source point often. Sample from a few different areas around the text to mimic the natural variations of the original background.
This kind of manual control is a world away from older editing techniques. The ability to do such detailed pixel work really took off with releases like Photoshop 7.0 way back in 2002, which gave us foundational tools like the Healing Brush. You can actually read more about the history of Photoshop's evolution on Fastprint.co.uk. Those early advancements are what allow us to delete text in Photoshop with the incredible precision we have today.
Work Smarter, Not Harder: Non-Destructive Text Removal
If you want to edit like a seasoned pro, the first rule is to protect your original image. This is where non-destructive editing in Photoshop becomes your best friend, especially when you're trying to get rid of unwanted text. It's a simple concept that completely changes the game.
Instead of painting or cloning directly onto your photo, you'll do all your work on a separate, transparent layer stacked on top. Think of it as a clear sheet of plastic over your original print—you can draw on it, erase, and experiment as much as you want without ever leaving a permanent mark on the photo underneath.

Setting Up Your Safety Net
First things first, open your image and head straight to the Layers panel. Create a new blank layer by clicking the little plus-sign icon at the bottom. This is where all your edits will live.
Now, grab your tool of choice—the Clone Stamp or Healing Brush are perfect for this. Before you do anything else, look up at the options bar at the top of the screen. You need to find the "Sample" setting. By default, it's usually set to "Current Layer." Change this to "Current & Below" or "All Layers."
This is the most critical step. It tells Photoshop to borrow pixels from the original image below but to paint them onto your new, empty layer. Every single brush stroke you make to cover the text is now safely isolated.
This workflow is all about flexibility. Not happy with how a section turned out? No problem. You don't have to undo everything and start from scratch. Just hide the edit layer, lower its opacity, or delete it completely. Your original image is always safe and sound.
Making this a habit is a huge step up in your editing skills. It's especially vital for important client projects or when you're tackling text in a really complex part of an image. This "safety net" approach lets you experiment with confidence until the result is absolutely flawless.
Using the History Panel to Fix Mistakes
We've all been there. You're deep into an edit, you make a change... and then another... and suddenly you realize you’ve gone too far. In Photoshop, mistakes aren't permanent. Your best friend in these situations is the History panel.
Think of it as a supercharged undo button. It doesn't just go back one step; it shows you a complete list of every single edit you’ve made in your current session. Each brush stroke, every adjustment, and each cloning attempt is logged as a distinct "history state."
If your last few attempts to remove some text with the Clone Stamp tool just made a bigger mess, don't panic. Just glance at your History panel and click on the state right before you started cloning. Boom. You're back where you started, no harm done.
This ability to track your edits and jump back in time is fundamental to how Photoshop works. If you want to dive deeper into the nuts and bolts, Adobe has a great help page on how Photoshop handles edits that's worth a read.
Create a Safety Net with Snapshots
Jumping back in time is great, but the History panel has an even cooler trick up its sleeve: Snapshots. A snapshot is like a bookmark for your edit. It freezes your entire image at a specific point in time, creating a temporary save state you can return to with one click.
Let's say you've just nailed the color grading on an image, but now you face the tricky task of removing a text overlay. This is the perfect time to create a snapshot.
- Find your History panel.
- Click the little camera icon at the bottom.
- Photoshop will add a new snapshot to the top of your history list, safe and sound for this session.
This simple click is your ultimate safety net. Now you can experiment with all sorts of crazy techniques to delete text in Photoshop, knowing your perfectly color-graded version is just a click away if things go wrong. It gives you the freedom to get creative without the fear of messing up hours of work.
Got Questions About Removing Text in Photoshop?
Even with a powerhouse like Photoshop, removing text from an image can sometimes feel like a puzzle. You’re not alone. Let's walk through some of the common hurdles and questions I see pop up all the time.
A big one is always about JPEGs. Can you actually remove text from a flattened image like a JPEG? Absolutely. The tools we’ve been talking about, particularly Content-Aware Fill and the Clone Stamp Tool, are built for exactly this kind of job. They work by intelligently sampling pixels from around the text to paint right over it.
How to Handle Tricky Situations
But what do you do when Content-Aware Fill makes a mess and leaves a weird, blurry patch? This is a classic problem. It usually happens because your selection was a bit too loose, causing Photoshop to grab pixels from an area you didn't want. The fix is often as simple as re-doing your selection with the Lasso Tool, but this time, get in really close to the edges of the text.
If you're dealing with a really tough background—think a patterned shirt, a detailed brick wall, or textured wallpaper—your best friend is the Clone Stamp Tool. For these situations, I always work on a new, separate layer. This non-destructive approach gives you the fine-tuned control to manually match patterns and lighting in a way automated tools just can't handle. You can dive into more solutions for tricky edits in our complete FAQ section.
So you've removed the text, but what if you need it back? If you followed the non-destructive layer method, you're in luck. Just hide or delete that layer, and the original image with its text reappears. If you edited the image directly, recovery gets a little more interesting.
Recovering an Earlier Version
The History panel is great, but it only helps during your current editing session. Close the file, and that history is gone. Fortunately, Adobe has stepped up its game here. Since Photoshop 2021, the Version History feature acts as a time machine for your file, letting you jump back to previously saved versions from minutes, hours, or even days ago. It's a huge safety net. You can see this powerful feature in action on YouTube to get a better feel for it.
If Photoshop feels like overkill or you just need a quick fix right in your browser, give SnapCaptionRemover a try. It’s a simple drag-and-drop tool that erases unwanted text from your images in seconds. Check it out at https://www.snapcaptionremover.com.