Erase Text From Image Photoshop The Easy Way
So, you need to erase text from an image in Photoshop? You're in the right place. The best way to get a clean, professional result is by using a few of Photoshop's incredibly smart tools. We'll focus on the three heavy hitters: Content-Aware Fill, the Clone Stamp Tool, and the Patch Tool.
Each one has its own strengths, and knowing which to grab for the job at hand is half the battle. Your choice really comes down to what the background behind the text looks like—is it a simple, flat color, or a busy, textured scene?
Let's break down when to use each one.
The 3 Core Tools for Erasing Text
Think of these as your text removal toolkit. I use a combination of them all the time, often on the same image, to get the job done right.
-
Content-Aware Fill: This is your best friend when you need a quick, intelligent fix. It works wonders when text is sitting on a busy, non-repeating background like a cloudy sky, a grassy field, or a wrinkled t-shirt. Photoshop literally looks at the pixels around your selection and cleverly generates a patch to fill it in. It's fast and often surprisingly accurate.
-
Clone Stamp Tool: When you need absolute, pixel-perfect control, this is the tool you want. It's a classic for a reason. You manually select a clean "source" area and then "paint" those pixels over the text. This is my go-to for cleaning up text near sharp edges or on very specific, repeating patterns where Content-Aware might get confused.
-
Patch Tool: This tool is a fantastic hybrid of the other two. You draw a selection around the text you want to remove, then simply drag that selection over to a clean, similar part of the image. Photoshop then does the heavy lifting, blending the "patch" seamlessly into place. It’s perfect for moderately complex areas where you want a bit more control than Content-Aware but don't need the painstaking precision of the Clone Stamp.
Before we dive into the step-by-step process, here’s a quick way to decide which tool to start with.
Choosing Your Photoshop Text Removal Tool
This table should help you make a quick decision based on what your image looks like. Remember, you can always start with one and switch to another to refine the details!
| Tool | Best For | Difficulty Level |
|---|---|---|
| Content-Aware Fill | Busy, non-repeating backgrounds (skies, grass, fabric) where speed is key. | Easy |
| Clone Stamp Tool | Precise edits, repeating patterns, and cleaning up edges. | Intermediate |
| Patch Tool | Moderately complex areas; offers a great balance of speed and control. | Easy |
Ultimately, mastering all three will give you the flexibility to tackle any text removal challenge, no matter how tricky the image.
For those seeking a deeper dive into various techniques, our guide on how to remove text from an image provides additional insights and step-by-step instructions that complement the methods discussed here.
While learning these Photoshop skills gives you ultimate control for professional-quality results, sometimes you just need a quick and dirty solution. For those simpler jobs, you might want to check out some dedicated online text remover tools that can automate the process.
But for true creative freedom and flawless edits, nothing beats getting your hands dirty in Photoshop.
Erasing Text with Content-Aware Fill: The Smart Approach
When you’re faced with text plastered over a tricky background—think wood grain, a grassy field, or textured fabric—Content-Aware Fill is your best friend. I turn to this tool constantly because it’s like having an intelligent assistant inside Photoshop. It's built for situations where manually cloning would be a nightmare.
What makes it so powerful? It analyzes all the pixels surrounding your selection and intelligently generates a new patch to fill the gap. It's smart enough to match the lighting, texture, and even subtle shadows of the original background. The result is often so good it feels like magic, making the text completely vanish.
Nailing the Initial Selection
The secret to a great Content-Aware Fill is starting with a good selection. You have to give Photoshop a clear instruction on what to get rid of. For this, I almost always grab the Lasso Tool (L). It’s perfect for drawing a quick, freehand outline.
Don't stress about making the selection super tight against the text. In my experience, it actually works better if you leave a little breathing room. Draw a slightly loose selection that includes a small buffer of the background pixels around the letters. This gives the tool more information to work with, which usually leads to a much cleaner fill.
Here’s a perfect example of a starting point. The selection is simple and clean, right around the text you want gone.
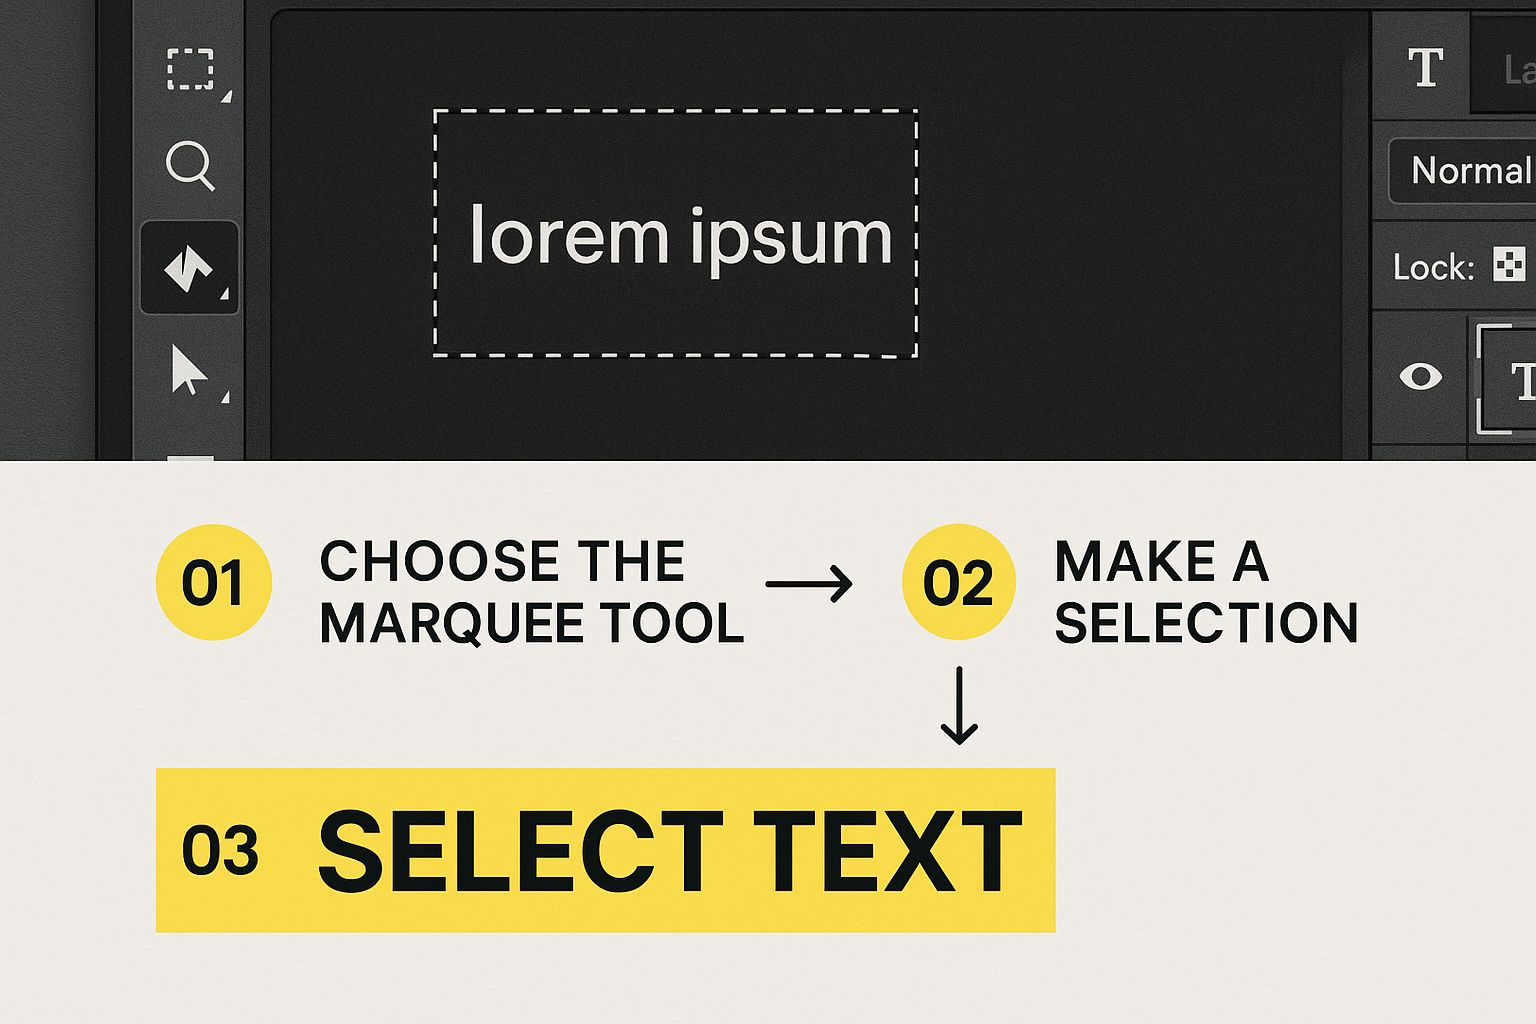 Getting this first step right is crucial.
With your selection active, head up to the menu and choose Edit > Content-Aware Fill. This will pop open a dedicated workspace, which is where you get to guide the tool and fine-tune the final result before committing to the change.
Fine-Tuning the Fill in the Workspace
Once you're in the Content-Aware Fill workspace, you'll see your image on the left with a green overlay and a live preview of the fix on the right. That green area is the sampling area—it’s showing you exactly which parts of the image Photoshop is "borrowing" from to create the patch.
This is where you take control. If the preview on the right looks a bit funky or you see that Photoshop is sampling from an area you don't want it to, you can fix it.
- To remove an area from the sample source: Just hold down the Alt key (or Option on Mac) and paint over the green overlay. You'll see it disappear.
- To add an area to the sample source: If there's a good spot you want Photoshop to use, simply paint over it to add it to the green area.
As you paint, you’ll see the preview on the right update in real-time. This interactive process lets you guide the AI until the result looks just right. You can learn even more about these powerful Photoshop removal features and how they can drastically speed up your work.
My Go-To Pro Tip: Always, always set the "Output To" option at the bottom right to "New Layer" or "Duplicate Layer." This is what we call a non-destructive workflow. It keeps your original image safe on its own layer and puts the patch on a new one. If you spot something you want to change later, you can just edit or delete that new layer without having to start from scratch.
When you’re happy with how the preview looks, click OK. Photoshop will add the new layer with the fill, and just like that, the text is gone. It's an incredibly efficient way to erase text from an image in Photoshop, and it’s a technique I use all the time.
Precision Control With The Clone Stamp Tool
While Content-Aware Fill is a fantastic, fast solution, there are times when you need more surgical precision. This is where a true Photoshop classic comes in: the Clone Stamp Tool (S). I reach for this tool whenever I need to erase text from an image in Photoshop that's sitting on a complex, repeating pattern or is just a little too close to an important detail you can't afford to mess up.
Think of it like this: Content-Aware Fill is like an automated painter, while the Clone Stamp Tool hands you the brush. You get total manual control, which is absolutely essential for tricky jobs. It’s my go-to for removing a logo from a plaid shirt, text from a brick wall, or a watermark right next to a person's eye—all situations where an automated tool might get confused and pull pixels from the wrong place.
The concept is brilliantly simple: you define a clean "source" point and then you literally paint with those source pixels over the text you want to get rid of. It’s a direct copy-and-paste painting method.
Setting Your Source And Brush
First things first, and this is non-negotiable for good editing habits: create a new, empty layer to work on. This keeps your original image completely safe and lets you erase any mistakes without having to undo a dozen steps. With the Clone Stamp Tool active, look at the options bar at the top and set the "Sample" dropdown to "Current & Below" or "All Layers." This is crucial because it allows the tool to sample pixels from your main image while you paint cleanly on the new layer above it.
To set your source, find a clean area of the image near the text that matches the background you need. Hold down the Alt key (or Option on Mac) and click on that spot. Your cursor will turn into a little target, letting you know you’ve grabbed your sample.
Now, just move your cursor over the text and start painting. You'll see the pixels you just sampled being painted right over the text. Mastering these fundamental brush techniques is key if you want to seamlessly remove writing from photos.
Mastering The Blend
Here’s where a beginner often stumbles. If you just clone from one spot over and over, you'll create an obvious, repetitive pattern that screams "this has been edited!" The secret to a truly invisible repair is to constantly resample your source point.
Pro Tip: Don't just Alt-click once and try to paint everything. I'm constantly re-sampling by Alt-clicking different areas around the text. This subtle variation is what sells the effect and makes the final image look natural and completely undetectable.
Your brush settings are just as important for getting a seamless blend. A few tweaks in the options bar can make all the difference.
- Hardness: Always start with a very low hardness, usually somewhere between 0-20%. A soft-edged brush is your best friend here, as it helps blend the cloned pixels smoothly into the surrounding area and avoids those harsh, visible edges.
- Opacity: I almost never work at 100% opacity. I prefer to lower it to around 30-50% and build up the repair in layers. This gradual approach creates a far more organic texture that doesn't look pasted on.
- Size: Get comfortable using the bracket keys [ and ] to quickly resize your brush on the fly. You'll want a smaller brush for tight corners and a larger one for covering broad, open spaces.
For example, if I'm removing text from a patterned shirt, I’ll first use a larger brush to clone the main pattern over the letters. Then, I’ll switch to a smaller, softer brush and lower the opacity to carefully reconstruct the fine fabric texture, resampling constantly to match the lighting and weave. It’s this methodical approach that ensures the repair is invisible, even when someone is looking closely.
Quick Fixes Using The Patch Tool
Sometimes, you need to remove text from an image in Photoshop, but you don't need the pixel-by-pixel precision of the Clone Stamp. This is where the Patch Tool (J) becomes your best friend.
I've always thought of it as a smarter, more hands-on version of Content-Aware Fill. It hits that sweet spot between automated magic and manual control, which makes it incredibly fast for the right kind of image.
It's my go-to for removing text from areas with relatively simple textures and consistent lighting. Think of a date stamp on a vacation photo, a small logo against a clear blue sky, or even a name drawn in the sand. The process couldn't be simpler: you just circle the text you want gone, then drag that selection over to a clean spot to create a "patch."

Photoshop does the heavy lifting by analyzing the pixels around the edge of your patch. It then works to blend the new texture, lighting, and color for a surprisingly seamless result.
Choosing Your Patching Mode
Before you get started, glance up at the options bar at the top of your screen. The Patch Tool has two main modes: Source and Destination. Knowing which one to use is crucial.
- Source Mode: This is the default setting and, honestly, the one I use 90% of the time. You draw your selection around the problem text (the "source") and then drag it to a clean area. Let go, and Photoshop replaces the bad with the good.
- Destination Mode: This is the opposite. You select a clean area first (the "destination") and drag that patch onto the text you want to hide. It's less common for text removal but can be handy for duplicating texture elements elsewhere in your image.
For erasing text, just make sure you've got Source selected.
My Personal Workflow Tip: I can't stress this enough: always work on a duplicated layer. Hit Ctrl+J (or Cmd+J on a Mac) before you do anything. This is your safety net. If a patch looks off, you can just delete the layer and try again without ever messing up your original image.
Executing The Perfect Patch
Alright, you have your duplicate layer active and the Patch Tool set to Source. Now, draw a loose selection around the text. Just like with Content-Aware Fill, it helps to include a little bit of the background inside your selection—this gives Photoshop more information to work with for a better blend.
Next, click inside your selection and drag it over to a clean, nearby area. You're looking for a spot that closely matches the texture and lighting of the area you're fixing. You’ll see a live preview as you drag, which is a massive help.
Once you find a spot that looks right, just release the mouse button.
Poof. The text is gone. It's one of the most satisfying and efficient ways to clean up an image. The real trick is finding a good source area. If the texture or lighting is too different, the patch will stick out. But for images with simple backgrounds, the Patch Tool is often the fastest and cleanest solution in your entire toolkit.
Working Smarter With Non-Destructive Edits
Taking your skills to the next level when you erase text from an image in Photoshop isn’t just about mastering the tools—it’s about mastering a professional workflow. The single most important habit you can develop is non-destructive editing. Think of it as your ultimate safety net, ensuring you never permanently damage your original photograph.
The core of this workflow is simple: always work on a duplicate layer. Before you touch the Clone Stamp, Patch Tool, or anything else, just hit Ctrl+J (or Cmd+J on a Mac). This instantly creates a copy of your background layer.
All your edits happen on this new layer, leaving your original image untouched and pristine below. If a fix goes wrong or you just don't like the result, you can delete the layer and start over without losing a single thing.
Using the History Panel for Creative Freedom
Beyond layers, the History panel is your secret weapon for experimentation. Most people see it as just a multi-level undo button, but it’s so much more powerful than that. It’s really a timeline of your project, letting you jump back and forth between different stages of your edit.
For instance, you might try removing text with Content-Aware Fill. If it looks a bit strange, don't just undo it. Instead, take a snapshot of that state in the History panel. Then, you can jump back to the original and try the Clone Stamp Tool, creating another snapshot. This lets you compare different removal methods side-by-side without committing to one until you're absolutely sure it’s the best option.
While many users learn how to remove text from an image online using basic tools, really getting to grips with the History panel is what separates amateur work from professional results.
The History panel is more than a list of your recent actions; it’s a creative sandbox. Use snapshots to save different versions of your text removal edit. This lets you compare techniques and choose the most effective one without fear of losing your work.
Keeping Photoshop Running Smoothly
All this power comes at a cost. The History panel tracks every single edit, which can chew up a significant amount of system memory, especially when you're working with large files.
A key feature to know is the ability to purge the history buffer to free up those resources. This action permanently deletes your undo states, which is exactly why it's so critical to work non-destructively on separate layers first. Once your edits are locked in on a layer, you can safely clear the history to improve performance.
This functionality has been refined for decades since Photoshop's creation, becoming an essential tool for the more than 22 million Creative Cloud subscribers. You can learn more about managing these advanced features directly from Adobe.
This professional approach does more than just protect your original file; it gives you the confidence to experiment freely. By combining duplicate layers with smart use of the History panel, you can work smarter, not harder, and ensure your projects stay organized and your final edits are flawless.
Got Questions About Erasing Text in Photoshop? Let's Troubleshoot
Even when you know the tools, you're bound to hit a snag when trying to erase text from an image. Some situations are just plain tricky. Let's walk through a few common headaches I see all the time and how to work through them.
What if the text is slapped over something really busy, like a detailed cityscape or a crowd of people? This is where just one tool will almost always fail you. You have to get creative and combine your techniques.
I usually start with Content-Aware Fill to do the heavy lifting. It’s not going to be perfect, but it handles the bulk of the text and gives you a much better starting point. From there, I create a new layer and switch to the Clone Stamp Tool. Using a low-opacity brush, I can meticulously paint over any blurry or repetitive spots, slowly rebuilding the detail that Content-Aware Fill missed.
What If The Text Is Right Next To Something Important?
Removing text that’s touching a person’s face or a key part of your subject is probably the most common frustration. Precision is everything in this scenario. Don't even think about using an automated tool on the whole area—it's practically guaranteed to blur or distort the very thing you're trying to save.
The real solution is a careful mix of smart selections and manual cloning.
- Protect the good stuff: Grab the Pen Tool or Polygonal Lasso Tool and draw a very tight selection around the important object. This acts as a shield.
- Work in tiny sections: Use a very small, soft-edged Clone Stamp brush. You'll be carefully painting over the text right up to the edge of the line you just drew.
- Keep resampling: Don't get lazy and clone from the same spot over and over. You need to constantly grab new source points from clean background areas nearby to avoid creating ugly, repetitive patterns.
It’s slow, methodical work, no doubt about it. But it's the only way to get a seamless result without ruining the most important parts of your photo.
Does The File Format Actually Matter For This?
Yes, it absolutely can, and in ways you might not expect. For the actual editing process, working with high-quality, uncompressed formats like TIFF or PSD is always the way to go. They hang onto the most image data, giving you more to work with. But the story doesn't end there.
Photoshop’s history management is a double-edged sword. It’s great for undoing mistakes, but it can also leave behind data that bloats your file or, in some cases, reveals your editing steps.
Believe it or not, some formats can embed editing history data even if you have the History Log feature turned off. Professionals working on massive projects or sensitive images have noticed this with TIFF and PSD files, where the file size grows unexpectedly. If you're curious about the deep dive on this, you can see how users have tackled stripping this data in various Photoshop discussion forums.
For most people, this isn't a huge deal. Simply saving your final image as a high-quality JPG will strip out all that extra history data. But if you’re a pro, being mindful of how you save your master files is a very good habit.
If you're just trying to clean up something simple, like a Snapchat photo, and don't want to get tangled up in Photoshop, SnapCaptionRemover is a much quicker path. Our free tool uses AI to find and erase captions for you. You get a clean image in seconds, no editing experience needed. Give it a try for free at https://www.snapcaptionremover.com.