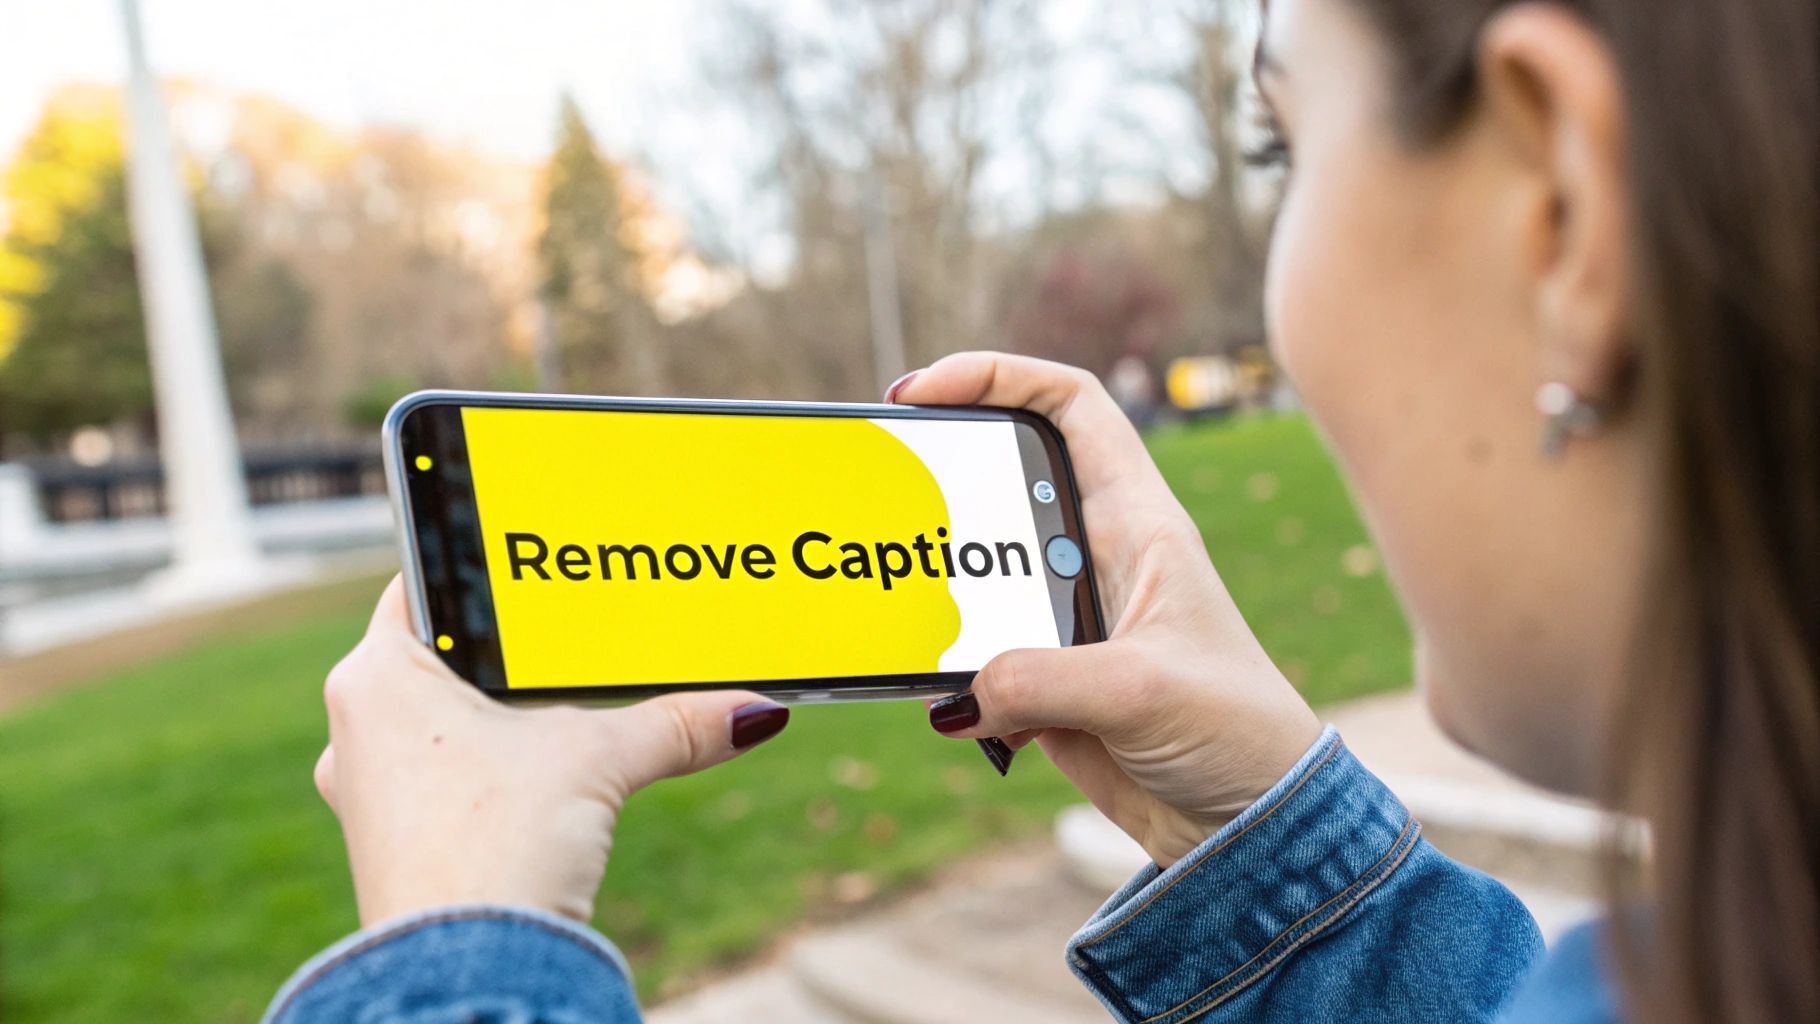
How to Remove Snapchat Caption from Photo Easily
We've all been there. You snap the perfect photo, add a witty caption for your friends, and hit save. But later, you look at the picture and realize the caption just doesn't work anymore. You want the original, clean image back.
Unfortunately, once you save a Snap with text, Snapchat flattens it into a single image file. The text becomes part of the picture itself, which means you can't just delete it within the app. To get rid of it, you'll need to turn to an outside photo editing tool.
Why Bother Editing Snapchat Photos?
It’s a situation every social media user knows well. That awesome candid shot or stunning sunset picture is now permanently stamped with an inside joke that doesn’t quite fit anywhere else. This is where knowing how to remove a Snapchat caption from a photo becomes a genuinely useful skill.
Maybe you want to use a casual photo for something a bit more serious, like your LinkedIn profile or a portfolio. Or maybe you're just putting together a digital photo album for your family and that "LOL" caption from last year feels out of place.
Common Reasons for Removing Captions
The reasons for wanting a clean, caption-free image are endless. From my experience, people usually want to:
- Create a clean version for memories: Sometimes you just want to preserve the moment without any distracting text.
- Repurpose content for other platforms: A caption that killed it on Snapchat might not land the same way on Instagram or a professional site.
- Fix a typo or awkward phrasing: We’ve all spotted a glaring mistake moments after saving the photo.
- Use the image in a new context: The original text just isn't relevant to how you want to share the picture now.
Snapchat is a powerhouse of user-generated content. Its most engaged users open the app over 30 times daily, which means a massive number of photos are being created and saved. You can find more fascinating stats in Snapchat's official reports.
Ultimately, learning a quick removal technique gives you full control over your own images. It lets you rescue a fantastic photo from a caption that’s outlived its usefulness. Instead of letting a great picture gather digital dust, you can easily adapt it for any situation.
Choosing the Right Caption Removal Method
So you've got a great photo, but it's stuck with a Snapchat caption. How you get rid of it really depends on what you need. Are you looking for a quick fix to share with friends, or do you need a flawless, professional-quality image? It's a classic trade-off between speed, quality, and convenience.
Think of it this way: if you're touching up a photo for your design portfolio or planning to get a large print made, you'll want to take your time. This is where powerful desktop software like Adobe Photoshop comes in. You get granular control over every pixel, which is essential for making sure the edited spot blends in perfectly, especially with a busy or detailed background. It takes more effort, but the results are unmatched.
But for most of us? We just want to get that text gone so we can repost a funny memory on Instagram or send a clean version to family. In that case, a dedicated mobile app or a simple online tool is your best friend. They're built for speed and simplicity, giving you a clean image with just a few taps.
Comparing Your Options
Ultimately, the right choice boils down to what matters more for that specific photo: a perfect edit or a quick result.
Here’s a simple way to think about it:
- For Absolute Perfection: Go with desktop software. The precision you get from manual editing tools is unbeatable for high-stakes images.
- For Speed and On-the-Go Edits: A dedicated mobile app is the way to go. You can fix the photo right on your phone, right after you save it.
- For a Quick Fix on Any Device: A web-based tool like SnapCaptionRemover is perfect. There’s nothing to install, and it works just as well on your laptop as it does on your phone. If you want to see a tool like this in action, check out our guide on a powerful Snapchat text remover.
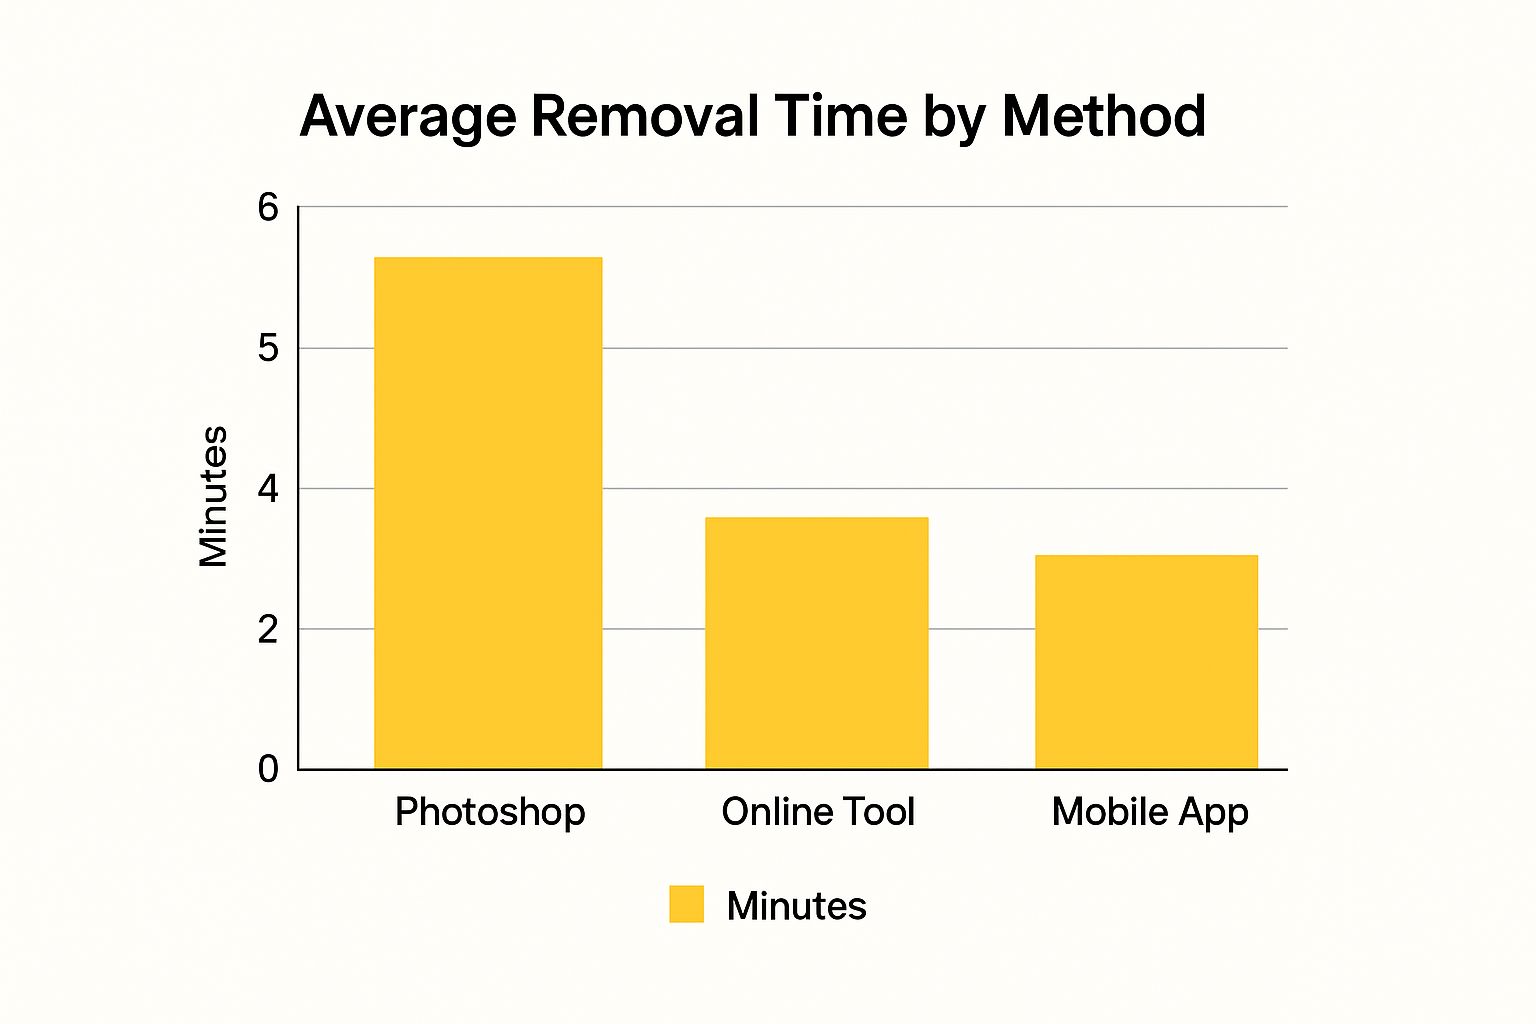
The image above gives you a good idea of the time commitment. As you can see, online tools are typically the fastest way to get the job done. Desktop software will take a bit longer, but that extra time buys you a much higher degree of control and quality.
Caption Removal Method Comparison
To make it even clearer, here's a quick look at the different ways to remove Snapchat captions and what each one is best for.
| Method | Effectiveness | Ease of Use | Best For |
|---|---|---|---|
| Online Tools | Good to Great | Very Easy | Quick fixes on any device without installation. |
| Mobile Apps | Good | Very Easy | Editing directly on your phone for social media. |
| Desktop Software | Excellent | Moderate to Hard | Professional results, large prints, and complex backgrounds. |
There's no single "best" tool for everyone. The trick is to match the method to your specific needs. By doing that, you'll get the result you want without any wasted time or frustration.
When Desktop AI Tools Are Your Best Bet
Sometimes, a quick fix on your phone just won't cut it. For those photos that really matter—maybe for a professional portfolio, a high-resolution print, or simply a memory you want to look perfect—turning to desktop software is the way to go. These powerful tools give you the precision and control you need to remove a Snapchat caption flawlessly.
Think about a photo with a really busy or patterned background. A simple mobile app might struggle, leaving behind a tell-tale blurry smudge where the caption used to be. This is where desktop AI really shines. It's much smarter at analyzing and rebuilding complex areas, giving you an edit that looks completely natural. It's this level of control that separates a decent edit from a great one.
Putting Advanced AI Object Removal to Work
Most powerful desktop editors come equipped with an AI object removal brush, and this is your secret weapon. The process is pretty straightforward. First, you'll import your saved Snapchat photo into the software. Then, you'll grab the AI brush and carefully paint over the entire caption you want to erase.
You can see what this looks like in a program like Filmora. The interface lets you be incredibly precise with your selection.

As you can tell from the image, you can zoom right in and change your brush size. This helps you cover only the text without messing up the background, which is key to a clean removal.
Getting That Perfect, Polished Finish
Once you've highlighted the text, the AI does its magic. It analyzes the pixels all around your selection and intelligently fills in the gap. Both the desktop and mobile versions of Filmora have advanced AI-powered tools that are surprisingly accurate for this kind of edit. Features like adjustable brush sizes and erasers give you the precision needed to remove captions without a trace. You can learn more about how these tools make editing easier on their website.
A Quick Tip from Experience: If the first pass isn't quite perfect, don't sweat it. I often have to re-apply the brush to a few stubborn spots. You can also use a clone tool—most good editors have one—to manually copy a clean part of the background over any small imperfections. That final touch-up is what makes the edit truly seamless.
Ditching Captions on the Go: Your Phone is All You Need
When you're out and about and need to clean up a photo right now, grabbing your phone is the obvious move. Mobile apps are built for exactly this kind of quick-fix scenario, letting you remove a Snapchat caption from a photo without the hassle of firing up a computer. For anyone who lives on social media, editing and resharing content in seconds is the name of the game.
The whole process is usually incredibly simple and designed for speed. You just pull the saved Snapchat picture from your camera roll, open it in the app, and use a tool—typically a brush or a selection box—to paint over the text you want gone.
Using a Dedicated Mobile Editor
This is where specialized apps like AniEraser really shine. They're built for this one job, so they do it well.
Once you’ve highlighted the caption, the app's AI kicks in. It smartly analyzes the pixels surrounding the text and fills in the background, making it look like the caption was never there. Honestly, the whole thing can take less than a minute.
Here’s a great example of what selecting a caption looks like inside one of these apps.
See how the caption is precisely boxed in? That targeted selection tells the AI exactly where to work its magic, which helps you get a much cleaner final picture without messing up the rest of the image.
For the best results, I've picked up a few tricks along the way:
- Zoom In for Precision: Always pinch to zoom in on the photo. This lets you make a much tighter selection around the caption, preventing the app from accidentally smudging parts of the background you want to keep.
- Work in Small Sections: If the text is sitting on top of a really busy or detailed background, don't try to remove it all in one go. You'll get better results by removing it in smaller, more manageable chunks.
- Perform Minor Touch-Ups: Sometimes, you might see a faint blur or shadow where the text used to be. Don't worry. Most of these apps have a "clone" or "healing" tool that's perfect for cleaning up those tiny imperfections.
I've seen a ton of apps pop up to meet this demand, and tools like AniEraser are a direct response. They make the process ridiculously easy: upload your picture, draw a box around the caption, and let the automated tool do the rest in seconds. It’s all about simplicity. You can find a great breakdown of how these removers work on Media.io.
Using your phone is definitely the way to go when speed and convenience are what you need. If you're curious about other ways to tackle this, you should check out our full guide on how to remove text from a Snapchat picture.
Common Editing Mistakes to Avoid

Knowing how to remove a Snapchat caption from a photo is one thing, but making it look good is another story entirely. I’ve seen it countless times—even with great AI tools, a clumsy edit can leave a weird, blurry patch right where the text used to be. The goal is a clean, natural finish, not a smudge that screams, "I edited this!"
One of the most common blunders is getting carried away with the selection brush. When you highlight a huge area around the text, you’re asking the AI to guess and fill in way more of the background than it needs to. This is what usually causes that soft, out-of-focus spot that just doesn't match the rest of the picture's texture.
Getting a Natural-Looking Result
Another classic mistake pops up with the clone tool, especially when you're working with a busy background. Picture a patterned shirt or a brick wall. If you just grab one little section and stamp it over the text, you end up with a repetitive, obviously fake patch. It looks terrible. The trick is to pull from several different spots to keep things looking random and natural.
Pro Tip: Always, always zoom in. Getting up close and personal with the pixels lets you make much more precise selections or clone stamps. It’s the single best thing you can do for a seamless edit.
Finally, don't sabotage your own work with a low-quality save. After all that careful editing, saving the file with aggressive compression can create ugly artifacts and blurriness, making your clean edit look like a mess.
To get a much more professional result, just steer clear of these common slip-ups:
- Be Precise: Keep your brush small and stick to covering just the text.
- Mix It Up: If you’re cloning, sample from a few different background areas.
- Save Smart: Export your final image using the highest quality settings to keep it looking sharp.
Getting these basics right will make a world of difference in your edits. For an even closer look at photo editing techniques, you can learn more about how to remove writing from photos in our detailed guide.
Let's get this out of the way: a great edit is one nobody knows is an edit. Once you’ve managed to remove a Snapchat caption from a photo, the final tweaks are what really sell the illusion. The whole point is to make the edited area blend in so perfectly that it looks like it was never touched.
Think about it this way: almost all digital photos, especially the quick snaps we take on our phones, have a little bit of digital “noise” or grain. It’s just part of how sensors work. If the spot where you erased the caption is perfectly smooth and clean, it’s going to stick out like a sore thumb. A pro-level trick is to add just a tiny bit of grain back into that specific area. This helps it match the texture of the rest of the image, making the whole thing look cohesive.
Making Sure the Colors Match Up
Another dead giveaway of a sloppy edit is mismatched color. A patched-up spot might look fine on your laptop, but then you look at it on your phone and suddenly see a weirdly discolored blotch.
Here are a few simple checks I always run through:
- Do the tilt test. Just tilt your screen back and forth. You’d be surprised how often this reveals strange shiny spots or dark patches in the area you edited.
- Go black and white. Sometimes, color can hide issues with brightness. If you temporarily convert the image to grayscale, you can easily spot if your edited area is too bright or too dark compared to its surroundings.
- Zoom way out. We spend so much time zoomed in, pixel-peeping. Step back and look at the image as a whole. Your eye is great at catching anything that looks unnatural when you see the complete picture.
Ultimately, you want a photo that just feels real. These little checks and balances make sure your edit can stand up to a closer look, so you can share it anywhere without anyone suspecting a thing.
Taking a few extra seconds to double-check the texture and color is what separates a decent job from a truly invisible one. You get to keep the memory, minus the digital graffiti.
Your Questions Answered: Removing Snapchat Captions
When it comes to getting rid of those pesky Snapchat captions, a few questions tend to come up again and again. I've heard them all, so let's clear up the confusion and get you editing like a pro.
Can I Really Get Rid of a Caption After I've Saved the Photo?
Yes, you absolutely can. The catch is that you can't just go back into Snapchat to do it. Once you save that photo to your camera roll, the text is essentially "baked in" and becomes part of the image itself.
But don't worry, it's not a lost cause. You just need a different tool for the job. Any decent photo editor with an object removal or "magic erase" feature can lift that text right off the saved image file.
Will Using an AI Tool Ruin My Photo's Quality?
That's a valid concern, but with the right tool, the answer is no. Most modern AI editors are pretty smart about preserving your photo’s original resolution. The real key is paying attention when you save your work.
Always double-check your export settings. Make sure you're saving the final, edited picture at the highest quality available. Some free apps can be aggressive with file compression, which leads to a blurry or pixelated result. A quick check of the settings makes all the difference.
What's the Best Approach for a Busy or Complicated Background?
When the caption is sitting on top of a tricky background—think patterned wallpaper, a crowd of people, or a detailed landscape—you'll want more precision. For these jobs, a desktop editor is usually your best bet.
These programs let you use a much smaller brush to tell the AI exactly what to remove. This manual control helps the software rebuild the background texture more accurately, leaving you with a seamless edit that looks completely natural.
Ready to rescue your photos from unwanted text? Get a clean, caption-free image in just a few seconds with SnapCaptionRemover. Our free, browser-based tool uses AI to erase text automatically—no complicated software or downloads needed. Give it a try now at https://www.snapcaptionremover.com.