How to Edit Photos Online A Simple Guide
Gone are the days when editing a photo meant chaining yourself to a powerful desktop computer. All you really need now is a decent internet connection and your web browser. A whole host of powerful, free tools can run right there, letting you crop, adjust colors, and even remove text from any device—no installation required.
Why Edit Photos in Your Browser?
If you've ever felt overwhelmed by complex, expensive photo editing software, you're not alone. The good news is, for most everyday tasks—from a quick touch-up for Instagram to prepping product shots for an online store—browser-based tools are more than up to the job. They've become a fantastic and flexible alternative.
The biggest win here is accessibility. Imagine starting an edit on your laptop at a coffee shop and then seamlessly picking up right where you left off on your home computer. There are no files to transfer or software licenses to juggle. It just works.
The Rise of Online Editing
This sheer convenience has lit a fire under the online editing market. Valued at $449.2 million in 2023, the global photo editing software space is on track to nearly double by 2032. This isn't just a niche trend; it's a massive shift driven by the relentless demand for great visuals on social media and in marketing.
This infographic really drives home how dominant and efficient online tools have become.
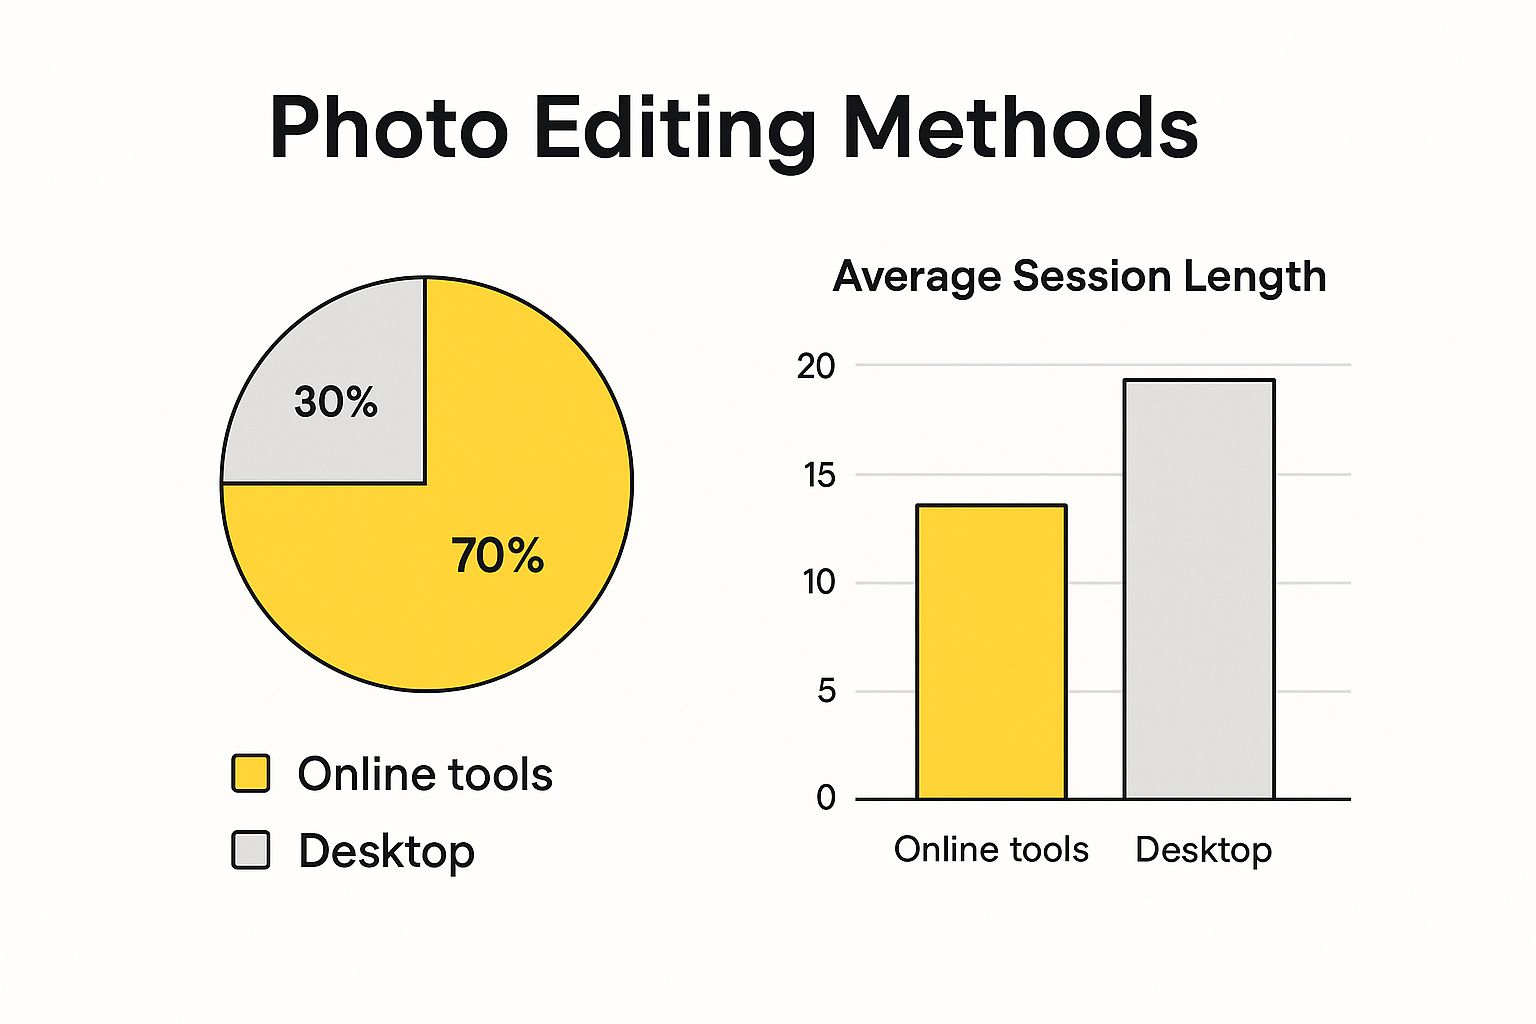 As you can see, it’s not just that more people are using them—they’re getting their work done faster, too.
The real power of online editors is that they’ve opened up photo editing to everyone. You no longer need a fat wallet or a steep learning curve to get professional-looking results.
At the end of the day, these tools simplify how you work without forcing you to compromise on quality. They're a practical way to improve photo quality online and produce some seriously impressive images, all without the traditional headaches.
Choosing Your Go-To Online Photo Editor
Jumping into online photo editing can feel overwhelming. With so many browser-based tools out there, how do you find the right one for you? Honestly, the best tool is the one that fits what you’re trying to do right now and matches your comfort level.
Are you just trying to brighten a dark photo or crop something for Instagram? Or are you digging in for more detailed work? The answer really points you in the right direction.
What Do You Actually Need to Do?
Think about the edits you make most often. If your days are filled with creating social media posts or quick marketing graphics, a versatile platform like Canva or Fotor is a fantastic starting point. They have a ton of templates and are built to be incredibly user-friendly.
But sometimes, you don't need a Swiss Army knife; you just need a screwdriver. Let's say you've got a perfect photo, but it's got a Snapchat caption plastered over it. In that case, a dedicated tool like SnapCaptionRemover is your best bet. It’s designed for one specific task—erasing text from images—and it does that job beautifully without a lot of extra fluff.
The real trick is to avoid picking a tool that’s way more complicated than you need. A simple, intuitive editor you actually like using will always be better than a powerhouse program you never bother to open.
From Free Tools to the Big Players
The great thing is, you don't have to spend a fortune. Many online editors offer powerful free versions that cover most everyday tasks. As you get more experienced or your projects get more demanding, you can always upgrade to a paid plan for more advanced features.
It's a model the industry giants have nailed. Adobe, for example, has done a brilliant job of bringing its professional-grade software to the web in a more accessible format. Just look at the clean, simple interface of their online editor.
Everything is laid out to be approachable, which is a huge help for anyone just learning how to edit photos online. This focus on the user experience is a big part of their success. It's no surprise that as of 2025, about one-third of people using photo editing software turn to Adobe Photoshop. If you're curious about market trends, you can dig into this analysis of photo editing software for more details.
Mastering Photo Editing Essentials
Alright, let's get our hands dirty with the core adjustments that take a photo from "okay" to "wow." Honestly, learning how to edit photos online isn't about memorizing every button and slider. It’s about getting a feel for a handful of key principles. These are the tools you'll come back to 90% of the time.
Think about a classic vacation photo—the kind that looks a bit dull and poorly framed on your screen. Maybe the main subject is off to one side, and the lighting feels flat. My first move in a situation like this is almost always a simple crop. Cropping is so much more than just cutting things out; it's your chance to re-frame the story. By trimming away the distracting extra space, you can guide the viewer’s eye right where you want it, creating a much more powerful image.
Finding the Right Balance with Light and Color
Once you've tightened up the composition, it’s time to play with light. This is where the brightness and contrast sliders become your best friends. Brightness lifts the overall light across the entire image, which is a lifesaver for those shots that came out a little too dark. Contrast, on the other hand, deals with the range between your darkest darks and lightest lights.
Just a small nudge to the contrast slider can add a beautiful sense of depth, making your subject "pop" right out from the background. It gives the photo a little more personality and dimension.
The goal of editing isn't to make a photo look fake; it's to make it look more like how you remember the moment. Good editing enhances the story that's already there.
With the light sorted, you can move on to the colors. The saturation and vibrance tools are what you'll reach for. Saturation boosts every single color equally, and if you push it too far, things can start looking garish and unnatural. I usually prefer using vibrance. It's a bit smarter, selectively increasing the intensity of the more muted colors while protecting the tones that are already well-saturated. The result is almost always more balanced and realistic.
These fundamental edits are the bedrock of great-looking photos. For a more detailed look at taking your images to the next level, you should check out our guide on how to make pictures look better, where we expand on these core ideas.
Real-World Example: A Quick Before and After
Let's see how this works with something practical, like a product photo for an online shop.
- Before: The initial shot is a bit dark, the colors look washed out, and there's a lot of empty, wasted space around the product.
- Action 1 (Crop): First, we crop in tighter. The product should be the hero of the image, not swimming in a sea of background.
- Action 2 (Brightness/Contrast): Next, a little boost in brightness and a touch more contrast make the product's details look much sharper and more defined.
- Action 3 (Vibrance): Finally, a small bump in vibrance makes the product’s colors more appealing and true-to-life without looking fake.
Just like that, with only a few simple clicks, the photo goes from looking amateur to professional and trustworthy. That’s the real-world power of knowing your way around the photo editing essentials.
Taking Your Edits Further with Smart AI Tools
This is where online photo editing starts to feel like magic. Forget spending hours on tedious manual corrections in complicated software. With a few clicks, AI can now handle some of the most challenging edits for you.
We've all been there—a perfect vacation photo ruined by a random person in the background, or the struggle to cut out a product for an online store. AI-powered tools do that heavy lifting for you. They analyze the image and make complex changes almost instantly, which explains why 58% of people have embraced AI photo editors. You can find more insights on AI image editing trends that show just how fast this space is growing.
Erasing Unwanted Text with AI
One of the most frequent headaches is dealing with text overlays, especially those baked into screenshots from Snapchat or Instagram Stories. Trying to clone or heal over that text by hand is a recipe for frustration, often leaving behind a blurry, telltale patch.
This is where a purpose-built tool makes all the difference. For instance, a service like SnapCaptionRemover is built on AI that’s been specifically trained to find and erase text from images, cleanly.
The process couldn't be simpler. You just upload your photo, and the AI takes over. It intelligently rebuilds the background that was hidden behind the caption, giving you a clean image in seconds. No technical skill required.
The best AI tools solve a single, frustrating problem so well that it feels effortless. They turn a task that used to be a major hurdle into a one-step fix.
This focused approach almost always beats what a general-purpose editor can do for the same task. It helps you rescue great memories and polish your content without the steep learning curve, getting you professional results without the hassle.
Polishing Your Photos Like a Pro
 It’s the little things that make a photo stand out. That final polish is where you turn a good snapshot into something you’re genuinely excited to share. This is your chance to be intentional and develop a look that’s all your own.
One of the best habits you can get into is what we call non-destructive editing. This simply means the online tool you're using saves your edits separately, leaving your original photo completely untouched. It’s a total game-changer, giving you the freedom to play around with different looks and go back to the original without any regrets or loss of quality.
Fine-Tuning Your Final Image
Now, let's talk filters. I know they get a bad rap sometimes, but when used with a light touch, they can work wonders. Applying a filter at a low intensity—think around 10-20%—can beautifully unify the mood of a photo. It’s not about a drastic makeover; it's more like a subtle push to enhance the atmosphere that's already there.
When you’re happy with your edits, the file format you pick is more important than you might think.
- JPEG: This is your go-to for pretty much any photo you plan to post online. JPEGs balance quality with small file sizes, which means your images will load quickly on websites and social media.
- PNG: Choose this format when you need a transparent background. It’s perfect for logos or graphics where you don't want a solid white box around your subject. The files are bigger, but they keep those sharp edges looking clean.
Before you hit that export button, do one last check. I always zoom in to make sure I haven't gone overboard with sharpening, which can make things look crunchy. A quick scan of the colors also ensures nothing has shifted into weird, unnatural tones.
This final quality check is what builds real confidence. Mastering these finishing touches is a huge part of learning how to edit photos online well. If you're tackling more specific tasks, like getting rid of distracting elements, our guide on how to remove text from a photo has some extra tips you might find helpful.
Answering Your Top Photo Editing Questions
After covering the basics, a few specific questions usually pop up. Let's dig into some of the most common things people wonder about when they start editing photos in their browser.
Can Free Online Editors Really Give Me Professional Results?
You bet they can. It's a common misconception that you have to pay for good software. The truth is, many free online photo editors are now packed with powerful tools that can deliver seriously professional-looking images.
For everyday tasks—like cropping for Instagram, tweaking colors to make them pop, or doing a bit of light retouching—the free options are fantastic. While a professional photographer might need the complex layering or batch processing found in paid software, you can absolutely create high-quality photos for your blog, social media, or personal projects without spending a dime.
What's the Best Way to Get Rid of a Text Caption on a Picture?
Hands down, the easiest and most effective way is to use a tool built specifically for that job, especially one powered by AI. These platforms are designed to look at the area around the text and intelligently fill in the background after the words are gone. The result is often seamless.
This is a huge step up from trying to do it manually with something like a clone stamp tool. That old-school method takes a lot of time and patience, and it can easily leave behind blurry patches or weird-looking artifacts. A dedicated AI tool is just cleaner and faster.
A perfect example is a tool like SnapCaptionRemover. It was trained on one thing: removing text. That focus makes it incredibly good at its job.
Do I Need a Super-Fast Computer for Online Photo Editing?
Not at all, and this is one of the best parts about using web-based tools. All the heavy lifting and processing happens on the company's powerful servers—what people call "the cloud"—not on your machine.
This means your computer's specs don't really matter. As long as you've got a decent internet connection and a standard web browser, you can make some pretty complex edits on almost any device. A basic laptop, a Chromebook, you name it. You don't have to worry about your computer slowing to a crawl.
Ready to clean up your favorite photos in seconds? Try SnapCaptionRemover today and see how easy it is to remove unwanted text with just a few clicks. Visit the SnapCaptionRemover website to get started for free.